Let’s jump right into the Pilates Spine Stretch Forward and optimise our forward bends. Got it? Here we go! We start with the most important thing: our powerhouse activation.
By the way, you’ll need a bit of time … about 30 minutes.😉
How do we activate our powerhouse in the Spine Stretch Forward?
We have 2 possibilities.
Possibility 1: Sit upright with legs straight so that you are in a neutral functional pelvic position. Extend your upper body through the 7th cervical vertebra, shift your weight to your sit bones and bring your arms up parallel to your legs. This is already enough to activate our DMCS – our deep muscle corset system, better known as our powerhouse;)
Possibilty 2: You can also consciously activate your DMCS using the ABC principle by
A – pulling your navel inwards and upwards towards your spine.
B – lengthening and bringing your chin towards your rib cage and
C – bringing your shoulder blades down towards your pelvis to stretch your upper body away from the floor.
Now read carefully, because this is really essential: The powerhouse organisation – as described in the ABC principle – is an ongoing and flexible concept. It is applied CONTINUOUSLY throughout the entire sequence of movements. Remember, remember!
Let’s sense our powerhouse!
Kinesthetic understanding of our powerhouse
To fully understand kinaesthetically what our DMCS – powerhouse – is doing during the Spine Stretch Forward, hold with your finger the part of your skin right on top of your navel. Pull this area of your abdominal muscles horizontally, vertically and spirally inwards and upwards. Horizontally inwards towards the spine, vertically upwards towards the ribs and head, and spirally inwards towards the centre line of your body. You can follow this well in the video below from minute 1:45.
Our DMCS must be active when we bend in the Spine Stretch Forward. If our powerhouse is not active, our muscles along the spine and back of the legs contract. This makes it more difficult to bend forward. Likewise, our body weight shifts to the intervertebral discs, which puts unnecessary strain on them.
The way the DMCS – our powerhouse – works is universal. If we want to keep our spine healthy, it must be used in all Pilates flexion exercises or yoga forward bends. Pilates flexion exercises are, for example, Rolling Like a Ball, Hundreds, Roll Over, Neck Pull, to name a few.
Back to the Spine Stretch Forward. Curious how to optimise it? Try our 3 magic tools and you’ll stand out in the Pilates crowd! Click on the video below and enjoy now.
What you will find in the video:
0:10 Powerhouse Activation
0:40 Picture of our powerhouse
0:52 ABC activation of our powerhouse
1:30 Kinesthetic perception exercise for our powerhouse
3:15 Magic Tool 1 – Hammock Stretch
3:33 Result 1 – More flexion
3:50 Magic Tool 2 – See Saw in supine position
4:45 Result 2 – Even more flexion
4:55 Magic Tool 3 – See Saw on all fours
5:33 Result 3 – Full flexion
3 magic relaxation tools for full flexion
Our 3 magic tools are based on the differentiated release concept. Our abdominal and back muscles thereby reflexively let go. The result: When we perform the Spine Stretch Forward afterwards, we perceive it differently mentally and physically. We achieve more flexion.
You will see that it doesn’t depend on age, physical or mental condition. Within 20 seconds, everyone can improve by at least 10 % how far they move forward with their upper body to their legs.
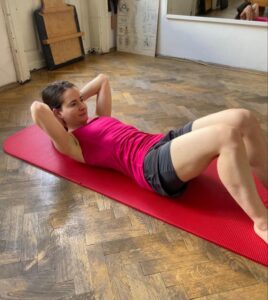
Magic tool 1 – The Hammock Stretch

Lie on your back with your knees bent. Your arms are beside your body. Put your body in the position as shown in the picture above. Relax for 5 minutes by saying and imagining our coaching keys. Make them tangible!
Coaching keys
- I relax my abdominal and pelvic floor muscles.
- I hold my head with my hand and not my stomach muscles.
- I pull my chin softly inwards towards my chest.
- I push the 7th cervical vertebra (C7) towards the floor.
You can see this well in the video from minute 3:15. Repeat the Spine Stretch Forward after this 5-minute relaxation and sense the difference.
Magic tool 2 – The Sea Saw lying on our back
Lie on your back with your knees bent and bring your hands behind your head. The elbows are parallel to each other. Lift your head away from the floor. The exercise has 2 phases.

Phase 1
Make a rocking movement – the Feldenkrais See Saw – in your upper body, alternating between
- pulling your abdominal muscles inwards and upwards, making your upper body long and expanding your chest upwards
and - making your belly into a balloon and pushing it down towards your pelvis.
You can see this well in the video from minute 3:50. Repeat this rocking movement 10 times.
Phase 2
The movement remains the same as in phase 1, but you first inhale into your belly. Then you hold your breath while performing the rocking movement 7 times. Exhale when you arrive at the movement towards the pelvis. You can follow this well in the video from minute 4:08.
Coaching keys
Again, use our coaching keys to get more out of the See Saw in the supine position. Say them and visualise them …
- I imagine that I have a ball in my belly that I move up and down.
- Before I bring the ‘ball in my belly’ towards my chest, I release my abdominal muscles.
- Before I bring the ‘ball in my belly’ towards my lower belly, I let go of my chest.
- I move my chest without my spine leaving the mat.
Repeat the Spine Stretch Forward and again sense the difference.
Magic tool 3 – The Sea Saw on all fours
Get into the quadruped position. Place your head in your folded hands on the floor as you can see in the picture below. Inhale into your lower abdomen, make it into a balloon, push it towards the floor and at the same time bring your pelvis forward to round your back. Then exhale as you bring your lower abdomen back towards your pelvis to return to the starting position. You can follow this sequence of movements in the video from minute 4:55.

Coaching keys
Also here, use our coaching keys to help you with the See Saw in the quadruped position. Say them and visualise them …
- I relax my lower abdominal muscles before inhaling.
- I maintain the balloon in my belly when I move my pelvis forward.
- I allow my entire spine and each vertebra to flex.
Repeat the Spine Stretch Forward again and sense the difference. Do you feel the magic?
The Spine Stretch Forward magic – Full flexion!
In a nutshell, this is what happens …
Magic Tool 1 – The Hammock Stretch
Result 1 – More flexion in the Spine Stretch Forward
Magic Tool 2 – The See Saw in supine position
Result 2 – Even more flexion in the Spine Stretch Forward
Magic Tool 3 – The See Saw in quadrupedal position
Result 3 – Full flexion in Spine Stretch Forward
Try it & fly with it!
Did you like our blog post? Then kindly support us and share it on social media sites like Facebook, Twitter, group forums, blogs and – all the retro way – personally among friends. We also highly appreciate your feedback on our exercises and posts.


