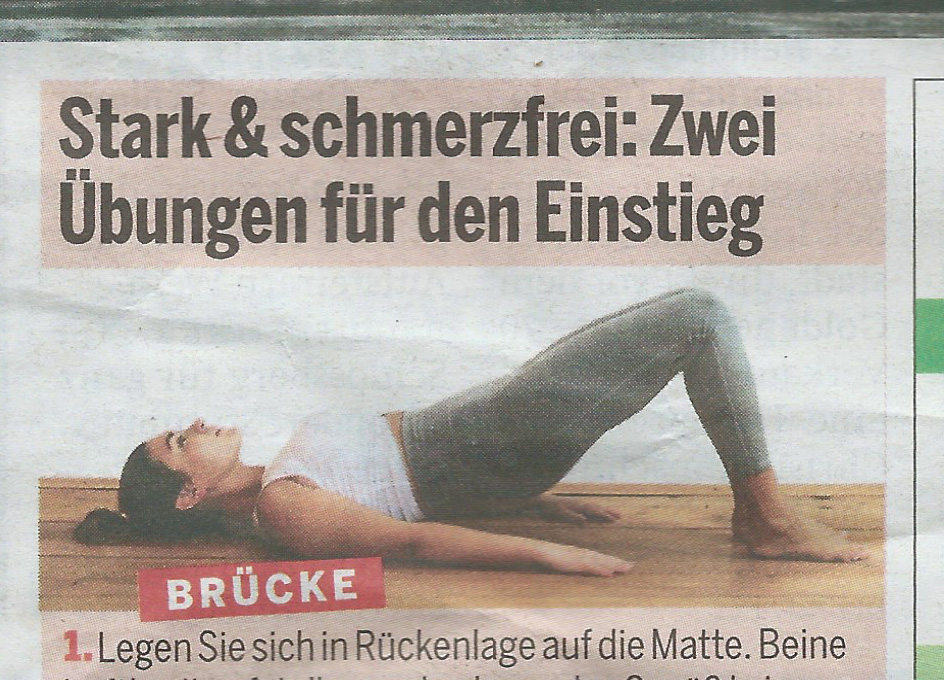
In the daily newspaper ‘Österreicher’ on 4.11.2018 I saw 2 Pilates exercises presented under the title ‘Strong & Pain-Free’. The 2 exercises – the Bridge and the Prone Head Lift – were part of a series of exercises as an introduction to a new Pilates book.
Critically, however, I notice some problems in the exercise presentation. Let’s start with the inconsistencies in the description of the bridge.
What can go wrong in the bridge

Phase 2 of the exercise instructions says: “Press your feet into the mat and activate the gluteal and abdominal muscles”.
Point 1: If we press our feet into the mat as described, we shift our body weight towards the head instead of towards the pelvis and thighs. This incorrect posture is clearly visible in the photo.
Point 2: If we then have hypertonus in our hamstrings, we will most likely get a cramp right there because we will automatically try to support the lift from the hamstrings instead of the glutes.
Point 3: After pressing our feet into the mat, we are supposed to activate our glutes and abdominals. Well if the hamstring is already bearing the weight of the lift, our glutes will mistakenly abduct instead of adduct when we activate them.
Furthermore, it is not clear whether with ‘abdominal muscles’ the ‘deep abdominal muscles’ are meant. This is essential because it is the deep muscle corset system that is supposed to work and not the straight and oblique superficial abdominal muscles.
How to find a way out of this body mess?
Eliminating disturbing patterns
To achieve the goal of this article ‘Strong & Pain-Free’, we need to do the following for the bridge:
- Bring your pelvis into a neutral position; your pelvis is neither tilted forward nor backward.
- Activate your DMCS (deep muscle corset system) to make your body long and then lift your pelvis upwards.

Make sure you lengthen through the activation of your DMCS and not through cortically pressing your feet on the mat. This kind of lengthening through the DMCS is noticeably important because it reflexively grounds our feet on the mat. It also lengthens our neck and allows our chin to move closer towards our chest. This means freedom of movement in our shoulder girdle area.
If you look up again at the photo of the bridge, however, you will see quite the opposite, how the back of the head and neck area shortens and the chin moves away from the ribcage.
Now, the second exercise, the Prone Head Lift. Well, according to the picture this exercise rather deserves the name …
Prone Collapse Neck Lift

The so-called Prone Head Lift is a misnomer, judging by the photo. It is simply impossible to lift our head effectively without first resting our chest on the mat. In the photo, we see an inefficient lifting of the head. The neck is in hyperextension and this makes the exercise worthless. Yes, even unhealthy. The exercise as shown in the photo should properly be called ‘Prone Collapse Neck Lift’ because of the neck hyperextension.
Let’s go through the exercise instructions here as well.
Phase 1 of the so-called Prone Head Lift says: “Prone position on the mat. Legs are extended backward and heels drop outwards to relax the gluteal muscles.” So far so good.
Phase 2 says: “Hands are under the forehead. The crown of the head pulls forward. Activate your powerhouse and lengthen the lumbar spine.”
Good! But how exactly do we activate our powerhouse so that we can lengthen our lumbar spine? This is an essential point because a lot can go wrong from the position in which the heels fall outwards in a relaxed manner to the activated powerhouse.
For example, posterior or anterior tilting of the pelvis can lead to the gluteus medius being more dominant than the gluteus maximus. This is exactly the wrong posture we see in the photo. In this position, it is not possible for us to use our powerhouse effectively. Our powerhouse cannot stabilize the lumbar spine.
Phase 3 says: “The hands and forearms press lightly into the mat. The crown of the head pulls forward and takes the head and hands upwards.” What can I say, look at the picture!

The cervical spine collapses and the gluteus medius is activated in a negative way. The lifting through the elbows instead of the width of the shoulder girdle causes the neck to tend to hyper-extend. This causes the upper trapezius to work noticeably more than the lower trapezius in combination with the shoulder girdle stabilizers. But only when the lower trapezius works in combination with the shoulder girdle stabilisers can we keep our shoulders down. This is not possible in the position on the photo.
How do we do the Prone Head Lift in a way that contributes to our health?
Discard unconscious movements

In order for us to achieve the goal of the newspaper article ‘Strong & Pain-Free’ in this exercise, we need to do the following in the starting position of the ‘Prone Head Lift’.
- Bring your pelvis into a neutral position; your pelvis is neither tilted forward nor backward.
- Keep your elbows on the mat and lift your head by lengthening your entire spine through your 7th cervical vertebra. This gives you a clear kinaesthetic awareness of your head-shoulder-girdle connection.
- Activate your DMCS – deep muscle corset system – and your shoulder girdle stabilizers, and release your chest to lift your head through your 7th cervical vertebra.
This type of exercise execution eliminates the sinking and collapse in our neck and preserves the integrity of our body as a whole – the basic criterion for ‘strong & pain-free’;)
My point in this post is that describing the shape and form of an exercise does not necessarily describe the function of the exercise. Only describing WHAT to do but not HOW to do it is a sure way to an unhealthy lifestyle.
Thinking, Feeling and Doing should be one, not 3.
Discuss it & fly with it!
Did you like our blog post? Then kindly support us and share it on social media sites like Facebook, Twitter, group forums, blogs and – all the retro way – personally among friends. We also highly appreciate your feedback on our exercises and posts.


